Tag: recipe

Maple Pecan Scone Recipe

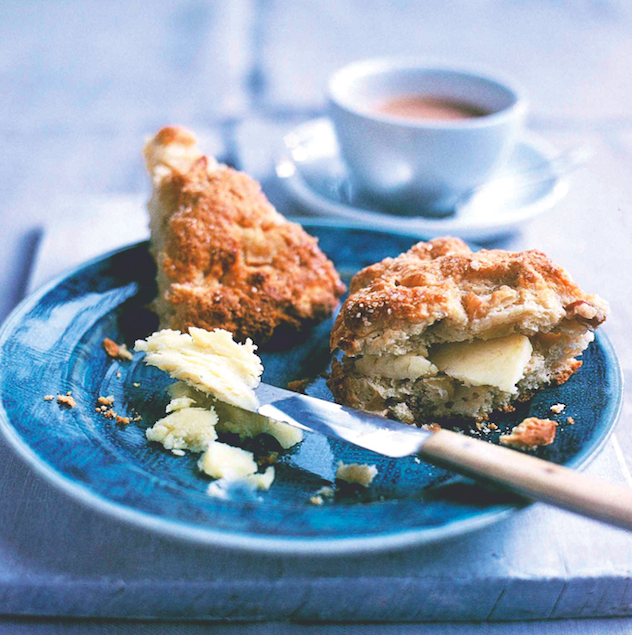
Scones make an ideal companion to a morning cup of coffee or tea. Simple and delicious, this recipe for “Maple Pecan Scones” from Linda Collister’s “Quick Breads” (Ryland, Peters & Small) is ideal for scone lovers who want something quick to make in the morning.

Maple Pecan Scones

Serves 6

2 cups unbleached all-purpose flour

4 teaspoons baking powder

A good pinch of salt

4 tablespoons unsalted butter, chilled and cut into cubes

1 cup pecan pieces

1 extra-large egg

1/4 cup pure maple syrup

About 3 tablespoons milk

1 greased baking sheet

Preheat the oven to 425 F.

Sift the flour, baking powder and salt into a large bowl. Add the butter and rub it in with the tips of your fingers until the mixture resembles fine crumbs. Mix in the pecans.

In a separate bowl, beat the egg with maple syrup and 1 tablespoon of the milk. Stir into the flour mixture with a round-bladed knife to make a soft, coarse-looking dough. If the dough is dry and crumbly and won’t stick together, stir in more milk 1 tablespoon at a time. If the dough is very wet and sticky, work in another tablespoon of flour.

Tip out the dough onto a work surface lightly dusted with flour and gently work it with your hands for a few seconds so it looks smoother. Put the dough ball onto the prepared baking sheet. Dip your fingers in flour and pat out the dough to a round about 11/4 inches thick and 7 inches across. Using a knife, cut the round into 6 wedges, but do not separate the dough before baking.

Bake for 18 to 20 minutes until light golden brown. Transfer to a wire rack and leave until the wedges are cool enough to separate. Serve warm the same day. The cooled scones can be wrapped tightly and frozen for up to 1 month.

PC174947

Give Boring Lunches a Big Boost

Lunch might not be the most exciting meal of the day, and conventional wisdom might not suggest it’s the most important meal. But that does not mean lunch has to be boring.

For those who tend to lean on sandwiches for their midday meals, straying from the sandwich norm can provide some variety and flavor. The following recipe for “Warm Tandoori Chicken Wraps” from Vicki Liley’s “Asian Wraps & Rolls” (Periplus) can make for a unique lunch for the whole family or even serve as an easily prepared dinner.

Warm Tandoori Chicken Wraps

Makes 6 wraps

1/3 cup plain tandoori paste

2 tablespoons plus 1/2 cup plain yogurt

Grated zest and juice of 1 lemon

12 chicken tenderloin fillets or 3 skinless, boneless chicken breast fillets

2 carrots, peeled

1 English (hothouse) cucumber, halved and seeded

6 pieces naan

1 clove garlic, finely chopped

Leaves from 6 fresh mint sprigs, plus 2 tablespoons finely chopped fresh mint

In a small bowl, combine tandoori paste, 2 tablespoons yogurt, lemon zest, and lemon juice. Put chicken in a baking dish. Pour tandoori mixture over and stir until chicken is coated. Cover and refrigerate for 2 hours.

Light a fire in a charcoal grill or heat a grill pan. Brush grill or pan lightly with oil. Cook chicken for 4 to 5 minutes on each side, or until juices run clear when pierced with a skewer. Transfer to a cutting board and let rest for 5 minutes. Cut each tenderloin into 2 long strips (if using chicken breast fillets, slice each fillet into 4 long strips).

Using a vegetable peeler, cut carrot and cucumber into thin ribbons. To heat naan, follow instructions on packet. In a small bowl, stir 1/2 cup yogurt, garlic and chopped mint together.

Place naan on a work surface. Divide chicken, cucumber, carrot, and mint leaves among naan. Drizzle with yogurt mixture. Wrap the naan around filling and serve immediately.

PC174950

How Bulk Cooking Can Make Meals Easier

Healthy family meals can get lost in the shuffle of busy schedules. Convenience may win out when parents are short on time, and it’s hard not to be enticed by the ease of fast food or the lure of frozen foods. While these options are certainly fine on occasion, there is a more nutritious solution for time-crunched families.

Planning is a big part of enjoying a homecooked meal, and cooking in bulk can help families enjoy more homecooked meals. By thinking ahead about meals, you can more easily enjoy homecooked dinners than if you were to wait until the last minute to think about what’s for dinner.

If bulk cooking is a foreign concept, the following are some resources to help you along.

· Get started by browsing cookbooks, online recipes or speaking with friends and family members about their favorite meals, especially those that may be popular with younger eaters. Concentrate on a specific meal each day. Dinner is the meal many families hope to share, as breakfast and lunch are often eaten outside of the home. Make a list of the ingredients that go into your family’s favorite meals, selecting recipes that use many of the same ingredients.

· Wait until you have a free schedule and ample time to go to the store to shop for all of your supplies. Have a list on hand and check off each item as you find it. Cooking in bulk also means you can buy in bulk. Very often bulk-size foods are discounted, saving you both time and money. Shop for the staples that are needed for most meals, including fresh herbs, cheese, spices, oil, and whatever flavorings your family finds most appealing. Large bags of rice and potatoes also are handy to have available.

· Take advantage of warehouse club membership fees or manufacturer or store coupon deals on multiple buy specials. Buying jumbo-sized packages of food makes more sense when you intend to cook in bulk.

· Clean out the refrigerator and freezer, as you will need plenty of room to store your ingredients, and later, your prepared meals. Figure out when you will be doing the cooking so you know what will need to be refrigerated or frozen once you return from the supermarket.

· Establish a dedicated cooking day. Many bulk cookers cook on the weekend. You may be able to have a spouse or friend take the children for the day so there will be no interruptions.

· Gather all items that need to be chopped or sliced and set them aside. Leave ample time to chop or slice, which can take a lot of time. Use all of your available cooking resources, such as the grill, stovetop, oven, and slow cooker, at once. Then just drop the ingredients in as necessary.

· Have plenty of freezer-safe storage containers on hand. Divvy up the meals into containers and label clearly. Now each day of the week you have a fast meal that can be heated up in no time. Fresh bread and a salad may be the only other components you need.


EL156197

Tips for Perfectly Grilled Vegetables

One of the highlights of the summer season is the incredible bounty of fresh produce, and grilling these vegetables gives them a smoky, delicious dimension. Chef BBQ Naz, a grilling expert from Broil King, shares some simple tips for flavor perfection.

* When preparing vegetables, slice them to expose as much of the vegetable to the grill surface as you can.

* Coat vegetables with olive oil before placing them on the grill. This will help prevent them from sticking to the grill.

* Use the right tool for the job. Accessories like grill toppers and skewers are perfect for keeping smaller foods like cherry tomatoes and onions from rolling around or falling through the grate.

* Don’t leave vegetables unattended. Vegetables are delicate and can easily overcook if not monitored.

* Grill extras. Leftover grilled vegetables are great in soups, salads, sandwiches and on pizzas and pasta.

When grilling vegetables, consider this popular recipe.

Grilled Zucchini Rolls

Ingredients

3 medium zucchinis, sliced 1/4-inch thick, lengthwise

1 tablespoon olive oil

4 ounces chevre (soft goat cheese), at room temperature

Pinch of freshly ground black pepper

Pinch of kosher salt

2 tablespoons sun-dried tomatoes, oil-packed and minced

1 teaspoon oil from the sun-dried tomatoes

1 teaspoon fresh thyme, minced

2 tablespoons Parmesan cheese, freshly grated

Directions

Preheat the grill on medium.

Brush both sides of sliced zucchini with olive oil and sprinkle with salt. Place on the grill and cook for 4 minutes per side.

When cooked, set on a wire rack to cool.

In a small bowl, combine the chevre, salt, pepper, sun-dried tomatoes, oil and thyme.

Using a small spatula, spread the cheese mixture thinly over one side of the zucchini. Lightly roll the zucchini, and place seam side down on a small, parchment-lined baking sheet. Sprinkle with Parmesan cheese. Place baking sheet on top rack of the grill for 15 minutes.

Remove to a platter and serve.

Additional recipes and a complete vegetable grilling guide can be found at www.broilkingbbq.com.


EL146318

Ice Cream Made at Home! Caramelized Honey Ice Cream

Ice cream is perhaps one of the most popular foods in the world. While many people visit their local ice cream parlor or grocery store frozen food aisle to satisfy their ice cream fix, this delicious and often decadent dessert can be made right at home. Those who want to try their hands at homemade ice cream should consider the following recipe for “Caramelized Honey Ice Cream With Rosemary and Orange” from Lori Longbotham’s “Luscious Creamy Desserts” (Chronicle Books).

Caramelized Honey Ice Cream With Rosemary and Orange

Serves 6 to 8

1/2 cup honey

2 cups heavy whipping cream

11/2 cups whole milk

2 6-inch sprigs fresh rosemary

5 strips orange zest, removed with a vegetable peeler

8 large egg yolks

1/2 cup sugar

Pinch of salt

1/2 cup fresh orange juice

Honey Caramel Sauce (see below)

Bring the honey to a boil in a medium heavy saucepan over medium heat. Boil for 5 minutes, or until darkened, but not burned, and very fragrant. Remove the pan from the heat.

Bring the cream and milk just to a boil in a large, heavy saucepan over medium heat. Stir in the rosemary and zest, remove the pan from the heat, and let stand, covered, for 15 minutes.

Discard the rosemary and zest. Whisk the honey into the cream mixture and cook, whisking occasionally, over low heat for a few minutes, until well combined and smooth.

Whisk together the egg yolks, sugar and salt in a medium bowl. Slowly pour in the warm cream mixture, whisking constantly. Return to the saucepan and cook, whisking constantly, over medium-low heat until the custard has thickened and coats the back of a spoon; if you draw your finger across it, it should leave a track. Do not let the custard boil or scorch on the bottom; if tiny bubbles appear around the edges, remove the pan from the heat for a few minutes to cool the custard, continuing to whisk.

Pour the custard through a fine strainer set over a large glass measure or bowl. Whisk in the orange juice. Let cool to room temperature, whisking occasionally, then refrigerate, tightly covered, for 3 hours, or until thoroughly chilled, or for up to 1 day.

When ready to freeze, pour the mixture into an ice-cream maker and freeze according to the manufacturer’s instructions. Transfer to a freezer container and freeze for at least 2 hours before serving.

To serve, spoon the ice cream into serving bowls or glasses. Drizzle with the Honey Caramel Sauce, if desired.

Honey Caramel Sauce

Makes about 2 cups

11/2 cups honey

1/2 cup heavy whipping cream

Pinch of salt

2 teaspoons fresh lemon juice

1/2 teaspoon pure vanilla extract

Bring the honey to a boil in a medium, heavy saucepan over medium-high heat. Boil for 5 minutes, or until darkened, but not burned, and very fragrant. Reduce the heat to medium-low and slowly and carefully pour in the cream. Add the salt, bring to a boil over medium heat, and boil for 5 minutes, or until slightly thickened; the sauce will thicken further as it stands.

Add the lemon juice and vanilla and pour the sauce through a fine strainer set over a medium glass measure or bowl. Serve hot or warm, or let cool and refrigerate, tightly covered, for up to 2 months. Serve chilled, or gently reheat the sauce before serving, adding a little water or cream if necessary to thin it slightly. PC15C746

Sliced Steak With Crispy Polenta

Parents faced with the nightly task of preparing meals for their families often feel as if there’s just not enough time to cook a hearty, homecooked meal the whole family can enjoy. Long hours at the office can make some parents feel like they need to be magicians to serve up a delicious meal in the time between arriving home from work and going to bed.

But family-friendly meals can still find their way to your dinner table even if you are pressed for time. The following recipe for “Sliced Steak With Crispy Polenta” from “Weightwatchers: Cook It Fast” (St. Martin’s Press) can be whipped up in roughly 30 minutes, meaning it’s entirely possible for families to sit down to a fresh and delicious meal any night of the week.

Sliced Steak With Crispy Polenta

Serves 4

1 1-pound lean flank steak, trimmed

1/2 teaspoon ancho or regular chili powder

1/2 teaspoon salt

1 16-ounce tube fat-free polenta, cut into 12 slices

11/2 cups fresh or thawed frozen corn kernels

1 red bell pepper, chopped

1/2 red onion, chopped

1 jalapen^to pepper, seeded and minced

2 tablespoons chopped fresh cilantro

1. Spray ridged grill pan with nonstick spray and set over medium-high heat. Sprinkle steak with chili powder and salt. Place steak in pan and cook until an instant-read thermometer inserted into side of steak registers 145 F for medium, about 5 minutes on each side. Transfer steak to cutting board and let stand 5 minutes. Cut on a diagonal into 16 slices.

2. Meanwhile, spray boiler rack with nonstick spray and preheat boiler. Arrange slices of polenta on rack and broil 5 inches from heat until crispy and heated through, about 2 minutes on each side.

3. Spray medium skillet with nonstick spray and set over medium heat. Add corn, bell pepper, onion, and jalapen^to pepper; cook, stirring, until softened, about 5 minutes. Remove skillet from heat and stir in cilantro.

4. Place 3 slices of polenta on each of 4 plates and top each serving with 4 slices of steak. Divide corn mixture evenly among plates.

Do it faster: To neatly and quickly remove the kernels from an ear of corn, place a bowl in the sink, stand the corn on end inside the bowl, and cut off the kernels with a knife. Any fly-away kernels will end up in the sink.

PC155117

Soda Bread for St. Patrick’s Day

St. Patrick’s Day provides the perfect opportunity to celebrate Irish culture. Such celebrations are not truly complete without some traditional Irish food, such as the following recipe for “Irish Soda Bread” courtesy of Linda Collister’s “Quick Breads” (Ryland, Peters & Small).

Irish Soda Bread

Makes 1 medium loaf

31/2 cups unbleached all-purpose flour

11/4 teaspoons baking soda

1 teaspoon sea salt

12/3 cups buttermilk (roughly)

Nonstick baking sheet, lightly dusted with flour

Preheat the oven to 425 F.

Sift the flour, baking soda and salt into a large bowl and make a well in the center. Pour the buttermilk into the well and mix it into the dry ingredients with a round-bladed knife or your hands to make a soft, slightly sticky, rough-looking dough.

Turn out the dough on a lightly floured work surface and shape it into a ball. Set the dough onto the baking sheet and gently flatten it so it is about 11/2 inches high. With a table knife, score the dough with a cross. Dust with a little flour then bake for about 35 minutes until a good golden brown. To test if the loaf is cooked, tap underneath with your knuckles. If it sounds hollow, it is ready. If it gives a dull thud, bake it for a few minutes longer and test it again.

Transfer to a wire rack to cool. Wrap well to store or freeze for up to 1 month.

Make Weeknight Meals Healthy and Simple

Households in which both parents work and kids have school and extracurricular commitments can get a little hectic, particularly on weeknights. Parents who want to prepare nutritious dinners may feel it’s impossible to do so without making elaborate, time-consuming recipes. But there are ways for busy, time-strapped parents to make sure weeknight dinners are both healthy and simple.

· Stock a healthy pantry. When grocery shopping, purchase some healthy nonperishable foods that you can rely on in a pinch. Instead of stocking the freezer with unhealthy yet easily prepared frozen foods that are often loaded with saturated fat, stock your pantry with whole grain pastas. Whole grain pastas are lower in calories and higher in fiber and contain more nutrients than refined white pastas. And once water is boiled, whole grain pastas can be prepared in roughly 10 minutes.

· Rely on a slow cooker. One of the simplest ways to prepare healthy meals that won’t take much time to prepare each night is to use a slow cooker. Set dinner in the slow cooker in the morning before leaving for work, and by the time you arrive home each night you will have a fully prepared, healthy meal ready to be served.

· Make meal prep a family affair. Families who share the responsibility of making dinner on weeknights may find it easier to prepare healthy meals. Younger children may not be able to join in the preparation of too many dishes, but middle school and high school students can help out by chopping vegetables while their parents work on other parts of the meal. Preparing meals can take as much time, if not more, than cooking meals, so making meal prep a family affair can save a substantial amount of time.

· Cook meals in advance. Families who are hesitant to use slow cookers may benefit by preparing healthy meals over the weekend and then refrigerating or freezing them so they can be cooked on weeknights. If you plan to freeze meals prepared in advance, remember to remove them from the freezer the night before and place them in the refrigerator so they are thawed out when you arrive home from work to place them in the oven.

· Choose simple recipes. Trying new recipes is one of the joys of cooking. But trying new recipes on weeknights can be time-consuming because cooks have yet to grow accustomed to each step in the recipe. When looking for new weeknight recipes, look for meals that can be prepared in five steps or less, leaving the more complicated recipes for weekend meals. FP165057

A Tasty and Traditional Take on Chicken

Chicken can be served in various ways, and that versatility no doubt contributes to the popularity of poultry. Some people love their chicken fried, while others can’t get enough grilled chicken. Baking chicken may not be as popular as frying or grilling it, but baked chicken is no less delicious. For chicken lovers used to frying or grilling their favorite meals, the following recipe for “Home-Style Baked Chicken” from Laurie McNamara’s “Simply Scratch: 120 Wholesome Homemade Recipes Made Easy” (Avery) may just make you a baked chicken devotee.

Home-Style Baked Chicken

Serves 4 to 6

2 tablespoons olive oil

2 tablespoons unsalted butter

11/2 teaspoons Poultry Seasoning (see below)

1 teaspoon salt

1/4 teaspoon freshly ground black pepper

1 cup unbleached all-purpose flour

1/2 teaspoon paprika

4 to 5 pounds skin-on, bone-in chicken thighs and

drumsticks

Preheat the oven and a 9-by-13-inch metal roasting pan to 375 F. Place the olive oil and butter in the pan and place the pan in the oven on the lower rack.

In a small bowl, combine the poultry seasoning, salt and pepper. Set aside.

Place the flour in a resealable bag. Place a few pieces of the chicken in the flour at a time, seal, and shake to coat. Remove and vigorously shake off any excess flour. Place the flour-dusted chicken on a clean platter. Repeat with the remaining chicken pieces.

Remove the roasting pan from the oven and immediately arrange the chicken skin-side up in a single layer over the bottom of the pan and then sprinkle with some of the poultry seasoning blend and paprika. It should sizzle.

Place the hot pan back on the lower rack of the oven and bake for 20 minutes. Remove, baste by spooning the juices that have collected in the pan over each piece, and then sprinkle the chicken with the remaining poultry seasoning blend.

Return the pan to the oven and bake for 20 minutes more. Remove and baste one last time before moving the chicken to the middle rack and baking for 10 to 15 minutes more to further crisp the chicken skin.

Let rest for 5 to 8 minutes before serving.

Poultry Seasoning

Makes 3 tablespoons

3 teaspoons dried thyme

11/2 teaspoons dried marjoram

1 teaspoon dried rosemary

1/2 teaspoon freshly grated nutmeg

2 teaspoons paprika

2 teaspoons ground sage

In a spice grinder or using a mortar and pestle, combine 2 teaspoons of the thyme, the marjoram and the rosemary. Blend until finely ground. Transfer to an airtight container and add the remaining 1 teaspoon thyme, the nutmeg, the paprika, and the sage. Store in a dry, dark place for up to 6 months.

Slow Cooking = Convenient & Delicious

Slow cooking has become very popular in recent years. The convenience of slow cooking, which allows home cooks to begin preparing meals in the morning or afternoon and then enjoy a delicious dinner without having to put in much work after a day at the office, no doubt plays a big role in that popularity.

Slow cooking also allows home cooks to experiment with various ethnic cuisines. For those who love Mexican food and slow cooking, the following recipe for “Pork and Shrimp Posole” from Andrew Schloss’ “Cooking Slow” (Chronicle Books) makes the perfect meal.

Pork and Shrimp Posole

Makes 6 servings

1/4 cup all-purpose flour
Fine sea salt and freshly ground black pepper
21/2 pound boneless pork shoulder (picnic ham), trimmed of most of the exterior fat and cut into 1-inch cubes
2 to 3 tablespoons olive oil
1 medium Spanish onion, chopped
1 small red bell pepper, seeded and chopped
1 fresh long red chile or serrano chile, seeded and minced
1 garlic clove, minced
1 cup good-quality, low-sodium chicken broth or fish broth
1 15-ounce can diced tomatoes, with juice
1 15-ounce can posole (whole hominy), drained and rinsed
12 ounces large (26-30 count) shrimp, peeled and deveined
Finely grated zest and juice of 1 lime
3/4 cups chopped fresh cilantro

Preheat the oven to 200 F.

Mix together the flour, 1 teaspoon salt and 1/2 teaspoon pepper on a sheet of aluminum foil. Toss the pork pieces in the seasoned flour to coat completely.

In a large Dutch oven, pour enough olive oil to coat the bottom generously and place over medium-high heat. Heat until the oil is shimmering hot. Working in batches as needed to avoid crowding the pot, add the pork to the hot oil and cook to brown nicely on all sides, about 5 minutes per batch. Transfer the pork pieces to a plate as they are finished. When all of the pork is browned, set aside. Do not discard the remaining flour mixture.

If the pot seems dry, add more olive oil and return to medium-high heat. Add the onion and bell pepper and saute^a until the vegetables soften, about 5 minutes. Add the chile and garlic and saute^a until the garlic is aromatic, about 30 seconds more.

Add the reserved flour mixture and stir until dissolved in the oil in the pot. Cook, stirring constantly, until the flour toasts lightly, about 1 minute. Add the broth and the tomatoes with their juices and stir to mix well. Return to a simmer and season with more salt and pepper, if needed. Return the pork to the pot, along with any juices that accumulated on the plate. Stir in the posole. Cover, transfer to the oven, and cook until the flavors have blended and the pork is fork-tender, about 6 hours.

Remove the pot from the oven, uncover, and stir in the shrimp and lime juice and zest. Re-cover and set aside and let the shrimp cook in the steam until firm and opaque throughout, about 2 minutes. Stir in the cilantro and serve.


PC15C749